First introduced by Colt in 1873, nicknames associated with the legendary Single Action Army revolver include Peacemaker, Frontier Six-Shooter, Model P, and the Hog-Leg. The design was rapidly adopted by the U.S. Army and used extensively during the Indian Wars period. Colt’s SAA was also used by lawmen, outlaws, cowboys, and other famous characters who helped to shape the legend of the American West.
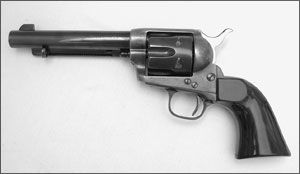
There were three manufacturing time periods for the Single Action Army, or Model P as the factory called it. The original production, known as the First Generation, was manufactured from 1873 through 1940. This run totaled 357,859 revolvers (including the Bisley and SAA Target models). After a lull of 16 years, in 1956, the Second Generation SAA was introduced. This run continued until 1978, when engineering changes, denoted by the letters “SA” after the serial number, gave us the Third Generation SAA, which is still being produced.
During early production, the aforementioned variant called the Bisley Model was manufactured from 1894-1915. The Bisley used a radically different hammer, trigger, and grip shape, but was built on the basic Model P frame. Target versions of both the Bisley and the SAA, termed by collectors as the “Flattops,” were also produced during the First Generation. The SAA Target was made from 1888 to 1896 and the Bisley Target from 1894 to 1913.
With its excellent action based on earlier Colt percussion revolvers, this William Mason design proved to be extremely durable. The SAA became known for reliability in critical situations, even with several parts broken or missing. Moreover, some of the Old West’s more colorful and able shooters showed us that the old Peacemaker was capable of being fired with much greater speed and accuracy than might seem possible from a gun with such a crude and simple action.
The one detracting feature of the design was its slow and awkward system of loading and unloading at the rate of one shell at a time. The Colt SAA (and its modern replicas) are single-action-only, made with removable grip straps. The SAA has been offered in many calibers such as 32/20, .357 Magnum, and 44/40 Winchester, but the standard and most popular caliber has always been the old stand-by .45 Colt. Standard revolvers were cataloged with barrel lengths of 4, 5, and 7 inches, although in the early years the factory would supply just about any custom barrel length the buyer wanted to pay for. The basic design remains one of the most popular and well known of all firearms.
Today we have several replicas or “clones” of the SAA being imported into the U.S. from factories in Germany and Italy, along with at least one excellent American-made copy. For the most part, these copies are not as expensive as an original Colt, so they have found a waiting market with “cowboy” shooters and Colt SAA lovers. A few of the earlier replicas earned a bad reputation for poor construction and parts that were prone to breakage, with some requiring the services of a skilled gunsmith before they could be used for anything. This has largely changed, and most of the modern-day copies have improved greatly in quality.
Colt Single Action Army Model 1873 Takedown Instructions
These instructions apply to Colt SAA revolvers, and generally to Italian-made Colt-type copies and clones.
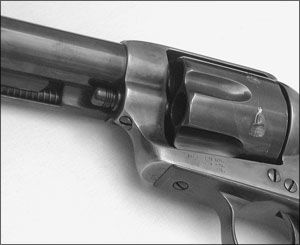
Unloading the Weapon.First, as always, be certain the weapon is not loaded. Check to make sure by opening the loading gate (#23) and pulling the hammer (#27) slowly to the rear until you’ve heard two audible clicks. This should have placed the hammer in the half-cock or loading position, and the cylinder (#12) should spin freely in a clockwise direction. Keep your fingers away from the trigger during this entire operation.
NOW slowly rotate the cylinder two full revolutions by hand, all the while examining the cylinder’s chambers through the opening that has been presented by the opened loading gate at the rear of the frame (#20). Make absolutely certain that there are no cartridges in the cylinder chambers.
Removing the Cylinder.For this operation, the hammer should be left resting in the loading or half-cocked position, and the loading gate should still be open. The Single Action Army’s cylinder rotates on a part called the base pin (#5), which must first be taken out the front of the frame before the cylinder can be removed. Colt has used two different methods to retain the base pin, and both of these are also seen on modern-made copies of the SAA.
The first type used on Colts up to about serial number 165,000 is the so-called “blackpowder-frame type.” With this type, the base pin is retained by a single lock screw located at the front of the frame, just below the barrel and ahead of the trigger guard. To remove the base pin, you first have to remove this lock-screw, then the base pin can be pulled straight out from the front of the frame (#20).
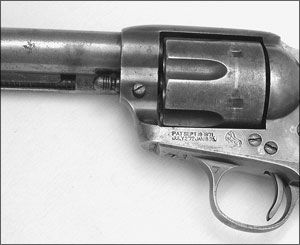
The second method, called the “smokeless-frame type,” uses a sliding, spring-powered cross bolt to retain the base pin. The base pin can be removed by first depressing this cross bolt, which Colt calls the base-pin screw (#7), then by pulling the base pin straight out the front of the frame. The cylinder (#12) is now free and can be carefully rolled out sideways from the right side of the frame.
Removing the Grips and Grip Strap.When the revolver is equipped with two-piece grips, unscrew and remove the grip screw (#42) from the center of the grip, and then lift off the two grips. Some of these revolvers are equipped with a one-piece grip, in which case you will unscrew and remove the two backstrap screws (#2) from the top-rear of the backstrap (#1), and remove the single butt screw (# 22) from the butt of the backstrap. The backstrap and the one-piece grip (not shown in the schematic) are loose and can be removed by pulling them down and to the rear as a unit. Once off the frame, the one-piece grip can be pulled forward and off of the backstrap.
Next unscrew and remove the mainspring screw (#33) from the inside-lower area of the trigger guard (#44). The mainspring (#32) is now free to lift out. Unscrew and remove the two rear guard screws (#34) and the front trigger-guard screw (#21), and the trigger guard (#44) will remove from the bottom of the frame.
Disassembling the Action. Unscrew and remove the sear and bolt-spring screw (#37) from the underside of the frame. This is the only screw inside the frame that faces straight up. The sear and bolt spring (#36) is now free to fall out the bottom of the frame. Remove the forward-most of the three screws on the left side of the frame. This is the bolt screw (#11) and it holds the bolt (#10) in place. The bolt can now be removed from the bottom of the frame. Be sure to keep the bolt screw with the bolt while they are removed, since the trigger screw (#45) can be easily mistaken for the bolt screw, which is almost identical but slightly shorter.
Next, remove the trigger screw (#45) and trigger (#43). The hammer screw (#30) can now be unscrewed and removed, after which the hammer (#27) is rotated slightly to the rear, pulled down and out of the frame.
The hand assembly (#31) is connected to the hammer and will come out of the frame with it. When you have the hammer (#27) out, the hand assembly (#31) can be removed by lifting it up out of its socket hole on the left side of the hammer.
Disassembling the Peripherals. The ejector-tube screw (#17) is unscrewed and removed from the front of the ejector tube (#16), allowing the entire ejector-tube assembly to be pulled to the side by its front until it moves slightly away from the barrel. At this position, the assembly can be withdrawn forward and off the barrel.
The ejector rod (#14), ejector head (#13), and its spring (#15) are removed by pulling them both straight back and out of the ejector tube. Note that on some early revolvers, you must unscrew the ejector rod (#14) from the ejector head (#13) and then remove each part separately.
Under the frame, in the right-side frame rail, you’ll see the gate-catch screw (#25). After removing this screw, the gate plunger (#24) and gate spring (#26) will come out through the same screw hole. The loading gate is now free to be removed by pulling it out to the front of the frame into the cylinder opening.


