Where coincident axis fails to exist in scope mounting, springing or stresses between metal parts will occur or scope reticle optical center may be compromised—or both. Either way, accuracy and precision becomes problematic at best. In most cases there is something we can do about it, as I shall point out in this treatise.
I was working with a pair of Talley scope bases and rings made for one of the earlier Model 112 Savage single-shot actions and was mounting an 8-32 Bausch & Lomb target scope of proven quality.
As I initially mounted the scope, the bore was precisely centered on a distant aim point but the scope reticle failed to adjust fully upward to the aim point. This indicated the rear base was too high for this particular rifle. I was using Talley Screw-Lock steel rings and Talley steel scope ring bases – a combination that has always yielded superb precision and alignment in a wide range of rifle applications—but this particular receiver was not compatible with these bases.
I was mounting this scope on one of my three older Savage Model 112 single-shot rifles. Unlike today’s Savage Model 12 rifles with round receiver front and rear, the former Model 112 had a flat rear receiver. These older models were available in long and medium length actions as well as single shot variants and are very rigid, producing excellent accuracy, but not many scope-ring combinations worked.
Milling And Bedding Scope Bases
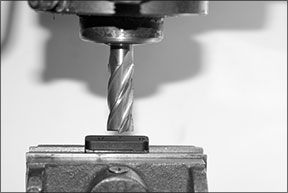
I looked at several possible solutions to the problem, including custom fitting a one-piece Picatinny style base, which I had done on a long-action Model 112, but I wanted to use this fine Talley mounting system if at all possible. I then got the idea to mill off the required metal from the rear base and set the bases in place with bases attached to the scope via the rings. Brownells Steel Bed was used as an interface between the scope bases and the receiver.

This is how it all came off. First, I milled 0.050″ from the underside of the rear base and attached both front and rear bases to the receiver. I then attached both scope rings to the scope and mounted these to the bases just as a scope would be mounted to the rifle. With this accomplished, the rifle was placed solidly in position with the bore viewing a distant aim point. I adjusted the scope with the reticle at optical center with respect to both elevation and windage. It was now very close to the position I wanted and decided not to mill any more from the rear base.
At this point I masked around the attached scope bases and removed the bases from the receiver and reattached the rings to the bases. Release agent was applied to the surfaces where the bases would come down on the receiver. Brownells Steel Bed was then applied to the bottom of each inverted scope base and the scope was gently and precisely lowered onto the receiver.
To be sure things were in true coaxial alignment, I viewed through the scope. It was still in alignment with the reticle focused to the exact aim point where the bore was directed. Following this, I carefully placed a couple strips of adhesive tape to secure the scope in place on the level receiver. The Steel Bed was allowed to sit for 24 hours before removing the scope from the bonded bases. A gentle tap with a brass hammer removed the bases, showing a perfect base-to-receiver fit. Without the Steed Bed interface it would be impossible to set a pair of milled bases atop a receiver resulting in true alignment.

The bases were cleaned up and screwed to the receiver. Brownells Scope Alignment Rods showed perfect scope/ring alignment, a condition otherwise impossible without the Steel Bed fix. Subsequent groups on target were most excellent with a full range of reticle adjustment available.
Conclusions on Scope Bases
Though it may appear an involved procedure, aligning and attaching scope bases in this way resulted in a most solid and stress-free scope base/ring alignment. It involves but a little time and a small amount of Steel Bed for a perfect job. I can strongly recommend it.


